
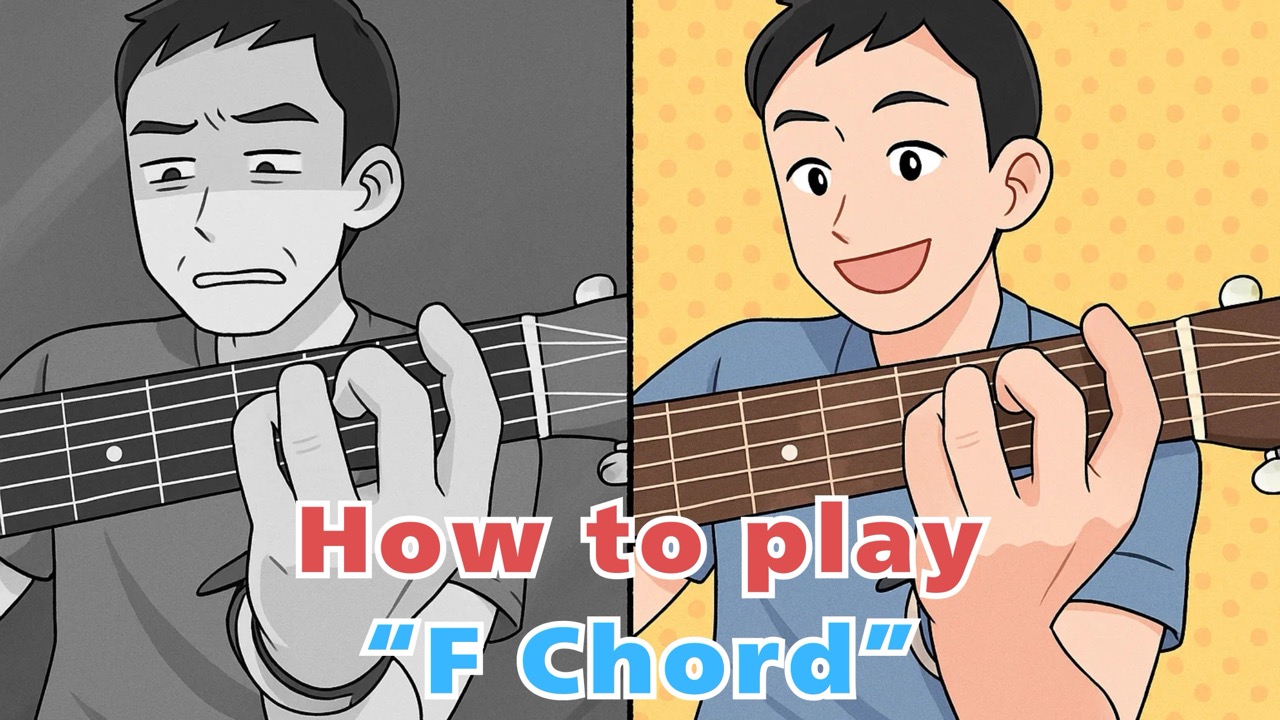
【The #1 Frustration】How to Absolutely Master the F Chord
Hello! I’m Shohei Takamura, head of Guitar Prescription TAKAMURA.
“I’m having fun starting guitar, but the F chord, you’re the one… you’re the one…!“
If you’re reading this article now, you’re probably screaming that heartbreaking cry in your head (or maybe even out loud), right? Your fingers hurt, they won’t bend the way you want, and even when you finally manage to press it down, you can’t get a clean sound. You try to play a J-POP hit, and this guy almost always shows up to break your spirit… that guy. The first and biggest wall many people hit is the “F chord.”
But don’t worry. I can promise you this. If you read this article to the end, one step at a time, without rushing, you will absolutely be able to play the F chord.
At Guitar Prescription TAKAMURA, I’ve taught over 400 students and even produced professional guitarists, and countless students have been on the verge of giving up because of the F chord. However, by knowing the right steps and a few little tricks, every single one of them has overcome this wall. This article is packed with all of that know-how. Now, let’s smash the “F-wall” together and open the door to the best guitar life!

Shohei Takamura
Head of Guitar Prescription TAKAMURA
From Kanagawa Prefecture. He became captivated by the guitar in middle school and spent his days immersed in music. He began his professional career in his 20s, working as a seminar instructor and handling sound production for famous artists. In 2011, in response to passionate requests from readers, he opened “Guitar Prescription TAKAMURA.” With the motto “The right content and the right steps in a smiling environment,” he has nurtured numerous guitarists. He is currently working hard with like-minded guitar instructors to expand Guitar Prescription TAKAMURA nationwide!
Chapter 1: Why Is the F Chord So Hard? ~Know Your Enemy~
There’s absolutely no need to think, “Why can’t I be the only one who can’t do it?” The F chord is difficult not because you lack talent, but because there are clear structural reasons why it’s hard. Before we fight, let’s get a good look at our enemy. Just understanding this will lighten your mental load considerably.

Reason #1: The first “Barre” of your guitar life, a major technique
The biggest reason the F chord is difficult is that it requires a technique called “barre”. This is a major move where you use one index finger to press down multiple strings (all six in the case of F!) at the same time. For a beginner who has been pressing one string with one finger for chords like C and G, this is a completely new encounter. To use a house analogy, it’s like you’ve been carrying single pieces of lumber, and suddenly you’re told, “Carry six pillars at once!” Of course, that’s tough… (lol).
Reason #2: The required “grip strength” and “finger independence”
To firmly press down six strings with a barre, you need a fair amount of grip strength. This isn’t just about being strong in general; it’s about a specific guitar muscle that isn’t developed in daily life.
Especially on an acoustic guitar, the strings are stiff and have high tension, so your hand might tremble at first. Furthermore, while you’re barring all six strings with your index finger, you must place your remaining middle, ring, and pinky fingers on different frets in the correct form. This is “finger independence.” It’s easy to fall into a panic where if you focus on your index finger, your middle finger won’t move, and if you focus on your middle finger, your pinky won’t listen.
Reason #3: The Final Boss – The powerful “belief” that “F is hard”
Actually, this might be the trickiest part. Whether you search online or ask friends, you only hear things like, “The F chord is hard~.” This makes you brace yourself before you even try, thinking, “Uh oh, this is the hard one…” and you unconsciously tense up your body. Your shoulders rise, your wrist stiffens, and your fingertips become rigid… In this state, you can’t press down what you otherwise could. The first step to conquering it is to think, “It’s normal for it to be hard, let’s just relax.”
Incidentally, I didn’t even know the “F” existed as a concept. The teaching method of my guitar teacher was so wonderful that I never felt the F chord was “difficult”; I just… learned it, as if by magic.
He probably carefully paved the way for me from the very beginning. Thanks to that, I was able to overcome it naturally without developing a negative mindset towards the F chord.
When you think about it, maybe the wall never existed in the first place. All that exists might be the belief that “this is difficult” and incorrect practice methods.
It’s not your fault the F chord is hard!
- The Barre: It’s a special technique you’re trying for the first time!
- Finger Strength & Dexterity: It requires a whole different level of skill than previous chords!
- Mentality: The belief that “it’s hard” is making your body tense up!
Now that you know the cause, all you have to do is tackle each issue one by one. In the next chapter, we’ll finally get into the concrete strategies!
Chapter 2: “Foundation Work” for Conquering the F Chord ~Prepping to Press with Minimal Force~
I often say this in my lessons, but improving at guitar is like “building a house.” If you try to erect a pillar (the F chord) right away on a shaky foundation, it will collapse immediately. To build the fine pillar that is the F chord, let’s start with the “foundation work.” By thoroughly preparing as described here, you’ll be able to press the F chord with surprisingly little force.
Prep #1: Your Guitar Form, Is It Really Okay?
A common reason for a dead sound is actually “poor form.” Please check the following three points.
- Left Thumb Position: Place your thumb on the back of the neck, around the middle or slightly to the left. If your thumb is peeking out from the top of the neck in a “rock form,” it will be difficult to apply pressure for the index finger barre. By placing your thumb firmly on the back of the neck, you can use leverage to press the strings efficiently.
- Wrist Angle: Is your wrist bent sharply? Try to keep your wrist relatively straight, leaving enough space between the neck and your palm to fit a small egg. A natural form can be achieved by slightly opening your armpit and bringing your elbow forward.
- Guitar Posture: Is the head of the guitar pointing too far down? A low headstock will cramp your wrist and make it harder for your fingers to reach. Use a strap or rest the guitar on your right leg (or use a footstool under your left leg in the classical style) so the neck is parallel to the ground or slightly angled up.
Prep #2: Your Guitar, Could It Be in “Hard Mode”?

If you’ve tried everything and your fingers are still in too much pain, your guitar itself might be in a very difficult-to-play condition. This is called having “high string action.”
String action is the gap between the fret and the string. If this gap is too wide, it takes an immense amount of force to press the string down, skyrocketing the difficulty. This is especially common with inexpensive beginner guitars, which often have high action straight from the factory.
At the 12th fret, try to insert two stacked 1-yen coins between the string and the fret. If the coins slide in easily or there’s a lot of extra space, your string action is likely too high. Ideally, it should be about 2.0mm-2.5mm for an acoustic and 1.5mm-2.0mm for an electric. Since one 1-yen coin is about 1.4mm thick, if two stacked coins fit easily, the action is quite high.
Adjusting the string action requires some technical knowledge, so if you’re not confident, I highly recommend consulting a music store or repair shop. If you tell them, “I’m having trouble pressing the F chord,” they can adjust it for a few thousand yen, making it surprisingly easy to play. This is one of the best investments you can make in yourself.
Prep #3: Increase Your Range of Motion with Finger Stretches
Before practicing, let’s warm up your finger muscles. This helps prevent injuries and allows your fingers to move more smoothly.
- Gently bend each finger backward one by one and hold for 10 seconds.
- Starting from the base of your fingers, slowly bend them forward and hold for 10 seconds.
- Repeatedly make a fist and then open your hand wide (clench, release, clench, release).
Doing this after a bath when your body is warm is also effective. Stretch gently and comfortably within your limits.
Chapter 3: 【Super Illustrated】The 3-Step Practice Method to Absolutely Conquer the F Chord!
The foundation work is complete! Now it’s time to erect the pillar known as the F chord. The important thing here is not to aim for the final form right away. Just like a baby doesn’t start running immediately. The shortest path is to break it down into simple steps—from crawling, to pulling up, to taking one step at a time.
First, let’s start by getting rid of the fear. You panic because you try to press all six strings at once. Let’s build up successful experiences with a “simplified F chord” using fewer strings and think, “Hey, I can actually make an F chord sound!”
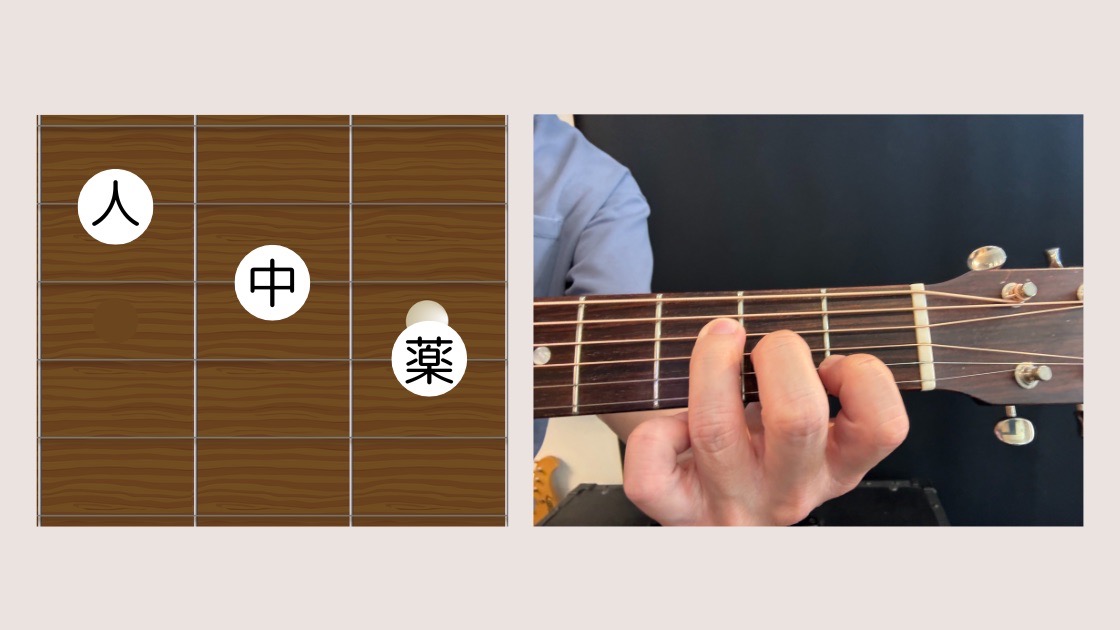
① The Easiest “F Major Seventh”
Start with this! It uses only four strings, and no barre is needed. The finger shape is a bit like a C chord. It has a chic, beautiful sound, so it’s fun to play. Once you get used to it, try pressing the 1st and 2nd strings simultaneously with your index finger. This is your first step towards a barre. At this stage, the chord changes from F major seventh (Fmaj7) to “F.”

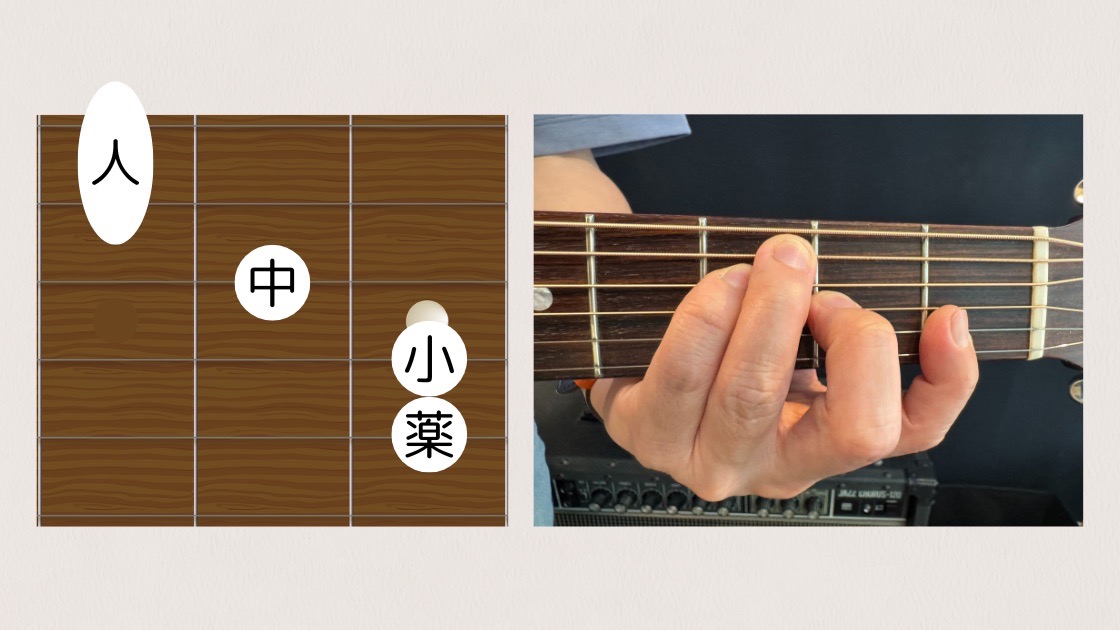
② Add the Ring and Pinky Fingers!
To the shape from ①, add your ring and pinky fingers. Still no barre. Then, strum only five strings (don’t play the 6th string). We’re getting closer to the full F chord! Try playing it while checking if strings 5 through 1 ring out cleanly.
The purpose of this step is not to get a perfect sound. It’s about “getting used to the F chord finger shape,” “feeling that the sound of F is pleasant,” and “accumulating small successes.” Take your time and have fun with it.
Once you’re comfortable with the simplified chords, it’s finally time to face the barre. Forget about the other fingers for a moment and focus solely on making all six strings ring out with just your index finger. This is the heart of conquering the F chord!
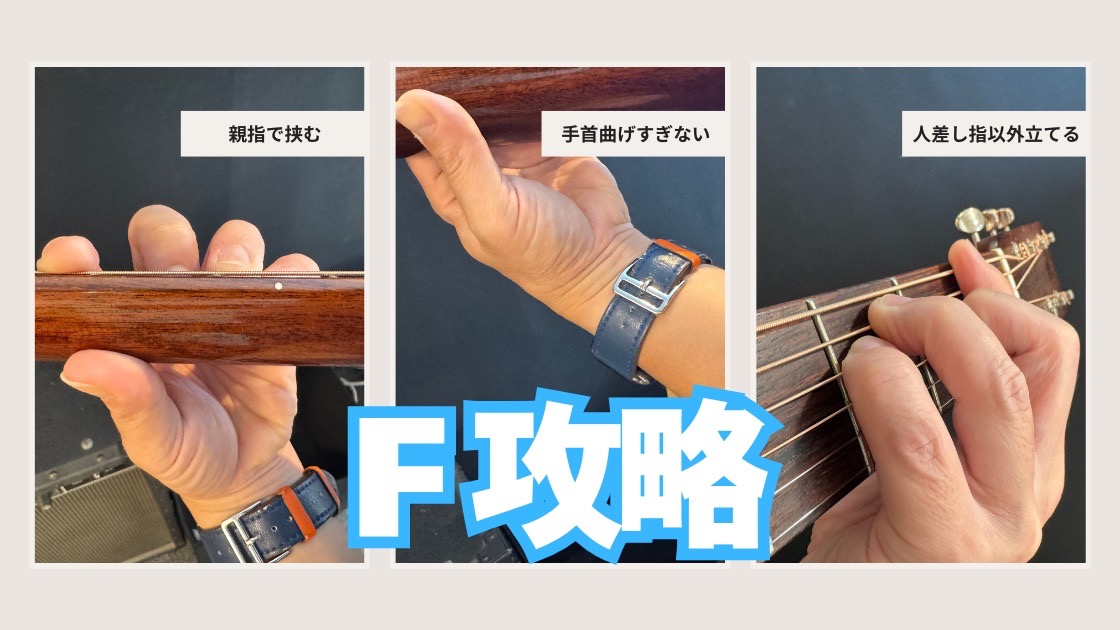
The 3 Big Secrets to a Successful Barre
- Use the “side” of your finger!
Are you trying to press with the fleshy, fingerprint part of your index finger? This is actually the biggest mistake. The fleshy part is soft, and the strings sink into it, preventing power from being transferred effectively. The correct way is to roll your finger slightly toward your thumb and press with the bony “side”. By pressing with the hard bone, you can firmly push the strings against the fret with less force. - Think about “arching” your finger!
Don’t just press with the side of your index finger; imagine it “forming an arc.” After placing your finger on the strings, try to imagine “arching it slightly backward.” This helps all joints make even contact with the strings, distributing the force. - Don’t “grip” the neck, “pinch” it between your thumb and index finger!
Don’t just squeeze the neck with brute force. Imagine a clothespin. The feeling should be like “pinching” the neck between your thumb (on the back) and your index finger (on the fretboard). If you bring your elbow slightly forward and let the weight of your arm rest on it, you can press with minimal force.

Specific Practice Routine
Keeping the three secrets above in mind, barre the first fret with just your index finger. Then, pluck each string from the 6th to the 1st, one by one. At first, you probably won’t even get half of them to ring out. That’s completely normal!
- If a string is muted, try adjusting the angle or position of your index finger by millimeters.
- Try shifting your thumb’s position slightly.
- Don’t get fixated on “making them all ring!” Set small goals like, “Today, it’s okay if just the 3rd string rings out.”
This tedious practice will have a huge payoff later. Try to do it every day, even if it’s just for 5 minutes.
▼ If your fingers hurt or you lack strength, trying lighter strings or a capo is also effective ▼
Let’s merge your other fingers with the ultimate barre you’ve trained in Step 2! The F chord is finally complete.
The Order of Placing Your Fingers is Key!
If you rush and try to place all your fingers at once, your form will collapse. Let’s place them one by one, checking each step along the way.
- First, barre the first fret with your index finger. (Review of Step 2)
- Next, place your middle finger on the 3rd string, 2nd fret. (Be careful not to lose pressure with your index finger)
- Finally, place your ring finger on the 5th string, 3rd fret, and your pinky on the 4th string, 3rd fret. (Arch your fingers so they don’t touch adjacent strings)
Once your form is set, check which strings aren’t ringing out by playing them one by one from the 6th string. This is the “F Chord Health Check.”
It’s perfectly normal for it not to be perfect at first. Praise yourself for small improvements, like “My pinky listened to me better today than yesterday.” This steady process of identifying and correcting the cause is the fastest way to improve.
Chapter 4: Congrats on Conquering F! The Infinite Possibilities Beyond
To you who can now play the F chord, congratulations! You have just taken a huge, huge step forward as a guitarist. And for mastering the F chord, an incredible reward awaits you!
If You Can Do F, You Can Do Them All! Conquer the Barre Chord Family
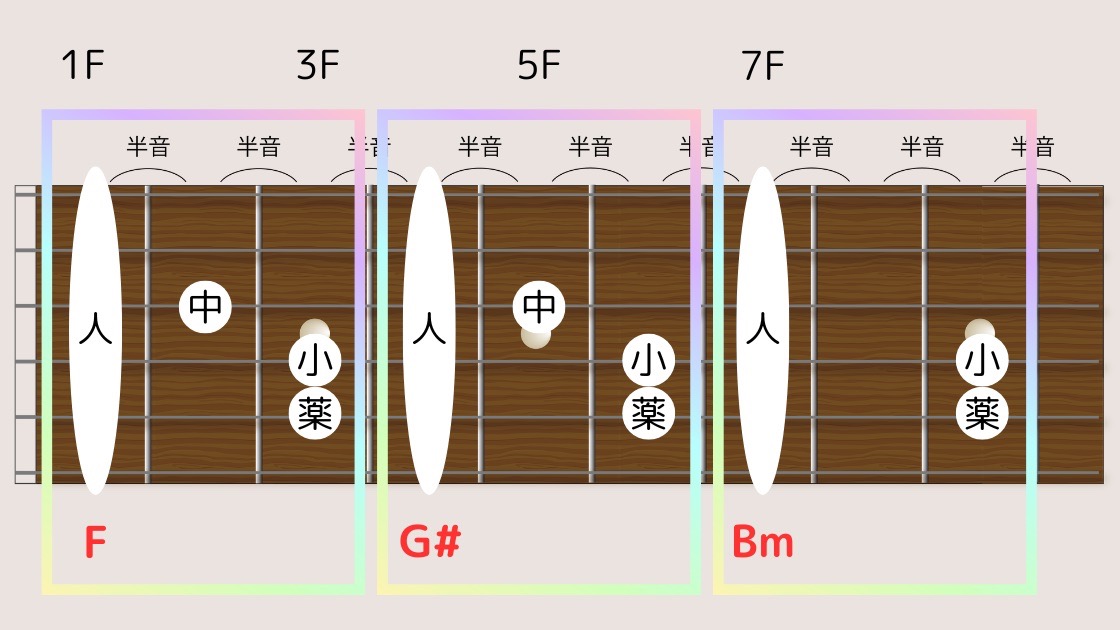
Actually, the F chord is like the eldest son of the “barre chord family.” Once you master this shape, you can play all other barre chords by simply moving the same finger shape horizontally along the fretboard!
- Move the F shape to the 2nd fret → G chord
- Move the F shape to the 3rd fret → G# (A♭) chord
- Move the F shape to the 5th fret → A chord
Isn’t that amazing? By learning just one shape, you can play all 12 major chords. Furthermore, if you learn the Fm (minor) shape (just lift your middle finger from the F shape!), you can similarly play all 12 minor chords. The moment you overcome the F-wall, your song repertoire will literally explode. That song you gave up on because of F? It’s yours now!
Practical Exercise: Try a Progression with F!
Once you can play the F chord by itself, let’s practice coordinating it with other chords. It’s okay to go slowly at first. The important thing is to change chords smoothly without breaking your form.
Practice Pattern ①: C → G → Am → F
This is a classic J-POP progression. The key is the transition from Am to F. Practice letting go of the Am shape and quickly forming the F shape.
Practice Pattern ②: F → G → C
This tests your slide from F to G. Practice sliding the F shape up two frets (one whole step) without letting it fall apart. If you can do this, you’re a respectable barre chord player.
Chapter 5: The “Ultimate Weapons” and “Mental Prescription” for When You’re Really Stuck
Even after trying all the methods introduced so far, you might still find yourself thinking, “I just can’t do it! Argh!” It’s okay, I’ve got some helper items and mindset tips for times like these.
Have you heard of an item called a capotasto (or just capo)? It’s a handy tool that clamps onto the neck to change the key of the entire guitar. Using this, you can play difficult chords like F with easier shapes.
For example, place a capo on the 1st fret and play an “E chord” shape. Lo and behold, the sound you hear is an “F chord”! This allows you to experience the sound of F without the barre. A capo also has the side effect of slightly lowering the string action, which means you need less force with your index finger to barre. I think it’s perfectly fine to have days where you say, “Let’s use a capo for a change of pace today,” and we even recommend it at Guitar Prescription TAKAMURA.
👉A Complete Guide to Guitar Capo Types and How to Use ThemIf you’re playing an acoustic guitar, reconsidering your string thickness (gauge) is also very effective. Most new acoustic guitars come with “light gauge” strings, but switching to a lighter set like “extra light gauge” or “custom light gauge” will reduce the string tension and make them dramatically easier to press. It will also reduce finger pain. Just go to a music store and ask for “the lightest acoustic guitar strings,” and the staff will help you out.
Finally, let me talk about the most important mindset.
- Don’t Rush: It’s normal for mastering the F chord to take time. Some people get it in a few days, others take a few months. That’s not a difference in talent, just individual variation. It’s fine to go at your own pace.
- Don’t Compare to Others: There’s no need to think, “My friend can already do it…” The only person you should compare yourself to is the you of yesterday. “I held it for one second longer than yesterday.” “The 2nd string, which was dead yesterday, rang out a little today.” That’s a perfect score.
- Don’t Give Up (But It’s Okay to Rest): If you think, “I’ve had enough!” it’s fine to step away from the guitar for a bit. Take a 2-3 day break, and when you come back with a fresh mind, you might find you can do it surprisingly easily. The important thing is not to start hating playing the guitar itself.
Improving at guitar is like climbing a spiral staircase. Even if it feels like you’re just going around in circles, you are steadily and surely climbing higher. Please, enjoy the process itself.
Conclusion: Beyond the F-Chord Wall to the Best Music Life!
Thank you for sticking with me this far! From the true nature of the giant wall that is the F chord, to concrete strategies, and even the right mindset, I’ve shared everything I have.
The F chord is like a “rite of passage” for many guitarists. When you overcome this wall, you will have gained not only technical growth but also immense confidence that “I can overcome anything difficult if I follow the right steps.” This will be an invaluable asset in your future guitar life, and indeed in your entire life (maybe that’s a bit of an exaggeration… lol).
Now, once you close this article, pick up your guitar and try starting from Step 1. If you’ve made even a little progress from yesterday, give yourself a huge pat on the back!
And if you ever feel “I’ve hit a wall practicing alone” or “I want to improve more efficiently and quickly!” please don’t hesitate to knock on the door of “Guitar Prescription TAKAMURA.” We will be your “motivation stand,” filling your tank with gas and giving our all to help your guitar life shine its brightest!
On the other side of F, the best music life is waiting for you. I’m cheering for you from the bottom of my heart!


Comments